Moodle has a host of time saving, and engaging activities and resources available for you to add to your Module page.
Scheduler allows you to quickly and easily setup, and manage your tutorial bookings, resulting in a space where students can book a tutorial slot with ease. The student also gets sent a reminder of the booked appointment!
Setting up your scheduler
- To add a scheduler to your Moodle module, use the 'add an activity or resource' function within the module page (Turn on editing and the option is under each topic) and select Scheduler
- You will then need to fill in the Name of your scheduler and can put an introduction if you wish (optional)
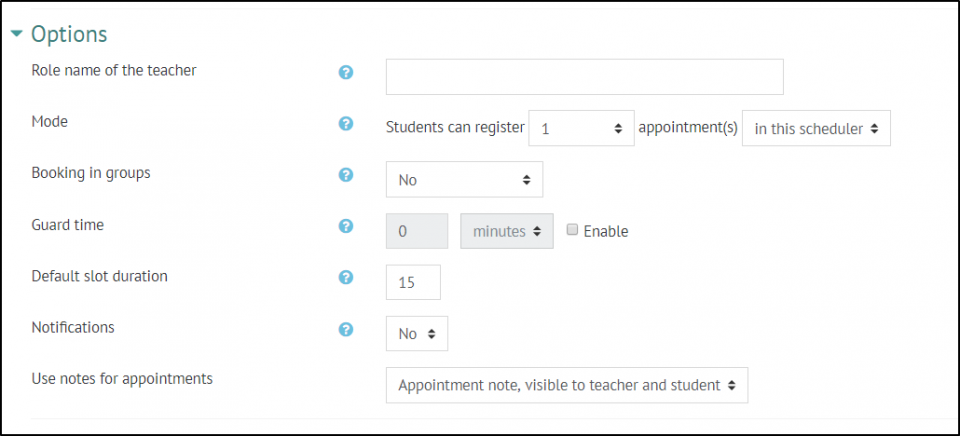
- Under options you will need to define the Role name of the teacher, this may be Tutor, Lecturer, Module Co-ordinator etc but is not their own name.
- You can then choose how many appointments you want students to be able to book as a maximum (1-10 or Unlimited) and whether they can book in groups.
- The Guard time prevents students from booking or cancelling their appointment within a certain time before the appointment. So for example, if it's set for 2 hours, students cannot book in or cancel for 2 hours before the slot.
- You can choose a Default slot duration, but you can then change the duration of individual slots later on.
- When Notifications is enabled the lecturer and student will receive an email when slots are booked or changed (note students only receive notifications regarding their own slots)
- You can also choose whether or not to use the notes function in the scheduler, you can choose for notes to be visible to both teacher and student, just to the teacher or to have both types of notes.
- Click Save and return to course or save and display
Adding slots to your scheduler
In your scheduler, you can choose the add slots option
Then choose whether you want to add repeated slots or Single slots
You can then choose:
- your date range,
- which days,
- the time range
- duration of the slots if it is different from the default set when setting up the scheduler
- To have a break between slots if you want a buffer between the end of one slot and the start of another.
- Maximum students per slot
- Location
- The lecturer, this should default to your name, but if it doesn't select your name from the drop-down box.
- whether to display all the slots now or a certain time before the slot (if you want to gradually release the slots)
- whether to email a reminder to yourself and the student before the slot
Click Save changes and your slots will appear. If you want to remove some for example to allow for a break, you can delete individual slots using the bin on the right-hand side of the slot, or amend individual slots using the cog.
If you require further support, guidance, or training on the effective use of schedulers, please contact the Technology Enhanced Learning team on tel@chi.ac.uk


