
What is Moodle?
Moodle is our virtual learning environment, where students can find their course materials, communicate and partake in activities.
Each module will have its own Moodle page, which will be controlled by the module coordinator.
Moodle pages can have activities such as forums, checklists, choice/votes, glossaries and quizzes. You can also set up a Moodle scheduler to simplify booking tutorials and add an assignment submission link to Moodle where students must submit their assignments.
Pages can also have resources such as text, images, files, folders, links to websites, videos, galleries and reading lists.
Start here!
This reference page is to be used alongside our online introduction to Moodle eLearning course. This course is designed for new and experienced staff and includes many tips and tricks to help you use Moodle efficiently and effectively.
If you have not yet completed it, please follow this link!
Moodle basics
How do I access my pages?
How do I access my pages? #
Moodle can be accessed from Moodle.chi.ac.uk
Any pages you are enrolled on can be found in your My Pages area in Moodle (more information on My Pages)
New Moodle pages are created for each module, each year. Each page will have the module coordinator and students enrolled automatically.
Please make sure that ChiView has been updated with any changes to module coordinators (more information on Module Coordinator Updates). Those who are recorded as module coordinators will automatically get access to the Moodle page and the MAF Online feedback forms. (more information on Understanding roles in Moodle)
Module coordinators are responsible for adding additional teaching staff to Moodle pages and additional markers on MAF. (More information on Enrolling a colleague to a Moodle page and adding someone to MAF Online).
If you need access to a page but are not the module coordinator, please contact your module coordinator to add you. If you are unsure who that is, please contact your departmental administrator who are also able to add tutors to modules.
How do students get access to the page? #
Students are enrolled on the pages according to what they are registered to take. If students do not have access to a page they are expecting, then contact modular@chi.ac.uk to check their registration, students should not be manually added to course pages.
If there are several groups for a module with different pages, (eg A, B etc) and the department wants students in certain groups, then the department needs to advise modular who should be added to which group occurrence.
Contact Modular@chi.ac.uk if a student is not enrolled on a page and should be. Students should never be manually added to a Module page.
How do I know which page to use? #
You may find you have several occurrences for each module. For example, you may have a page for each semester and then there may be pages for different cohorts if you have more than one group. You can see which page is appropriate from the full code in Moodle.
For example:
BML305_S1_A_25
BML305 = module code
S1 = Semester 1 (may also see S2 or AY to depict Semester 2 or All Year)
A = Instance (may also see B, C, D, E etc if a module is running for more than one group or if the page is for an academic partner you may see IOW, FH, CR and many more to denote the institution)
25 = Academic year (may also see 22, 23, 24, etc for previous years) The year denotes the academic starting year, so 25 would be academic year 25/26
If you have multiple Moodle pages for a module and would prefer a single page, we can merge the pages to create one overall page. If you have occurrences you are not using, we are also able to hide the unused pages. If you do not see an occurrence you expect to see, let us know and we can check if it is hidden.
Enrol a colleague on a module page
Adding a colleague to a module page. #
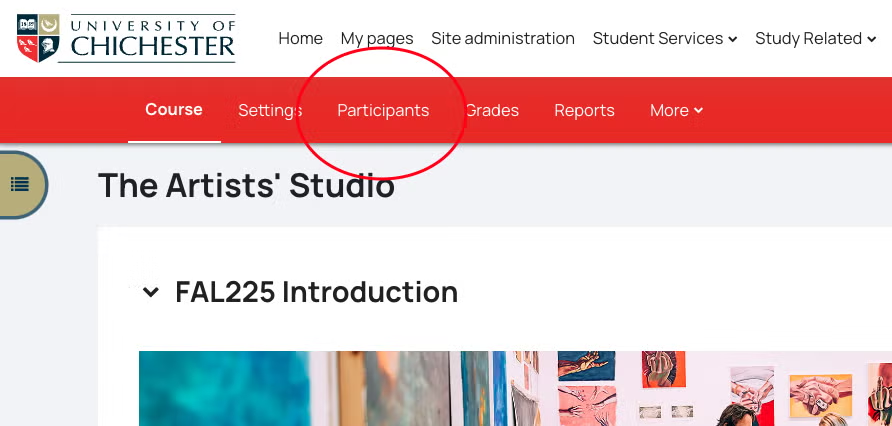
- If you need to add a colleague to a module, select Participants in the red banner at the top of the page
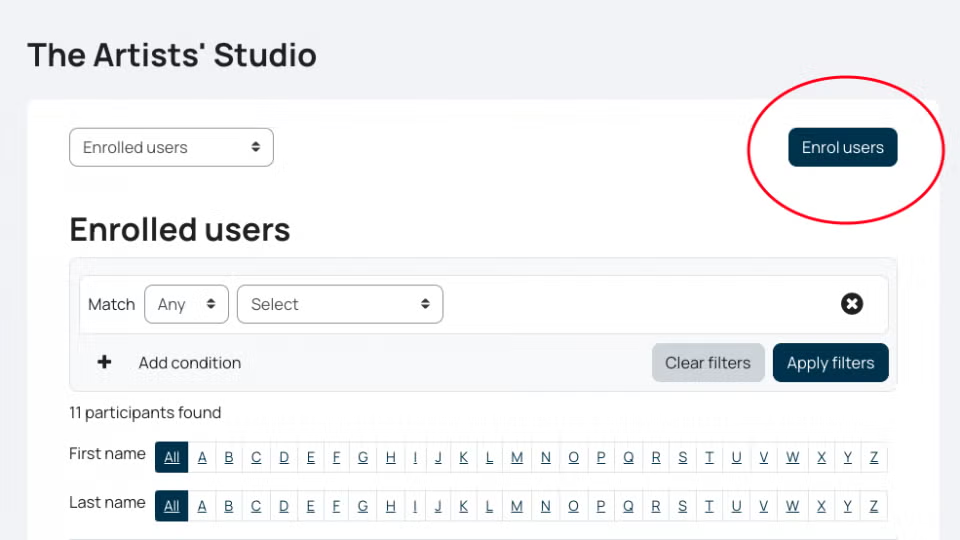
2. On the next page click the Enrol users button on the right hand side of the screen
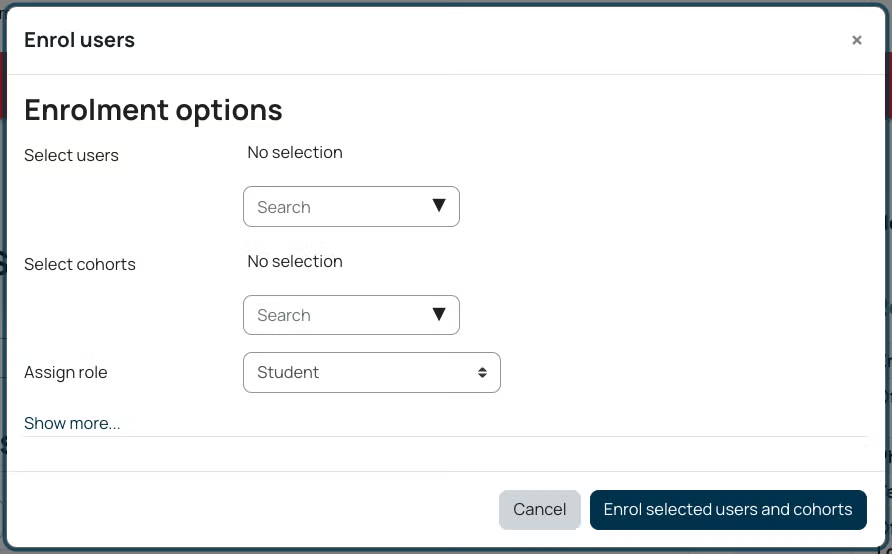
3. You will then get the enrol users screen, type in the name of the person you wish to enrol in the ‘Select users’ dropdown box, you can then add additional names as required
4. Ensure you are selecting the person’s staff account
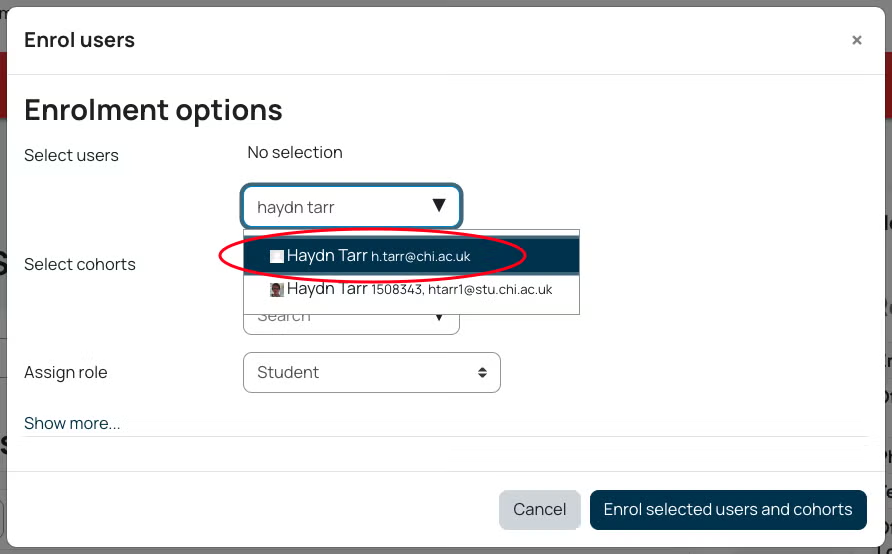
Note: many staff also have student accounts, these will have a number after the name and usually @stu.chi.ac.uk. If staff have the same name then double check the email address matches the one your member is staff is using.
5. Choose the appropriate role from the Assign role dropdown box. If you are the Module Coordinator, you will have the option to add Non-editing Lecturers, Lecturers or External Examiners. If you are a lecturer, you can only add other Lecturers. If the Module coordinator in incorrect, please make sure that ChiView has been updated (more information on Module Coordinator Updates).
Making announcements to a module
Announcements activity #
- Emails all participants on a page
- Can send attachments
- All communication is stored in one place in the Announcements (so as well as receiving emails the students can easily find the communication on the Moodle page)
- Communications can be sent with (or without) a 30-minute time delay to allow for editing
- One way communication, students cannot reply
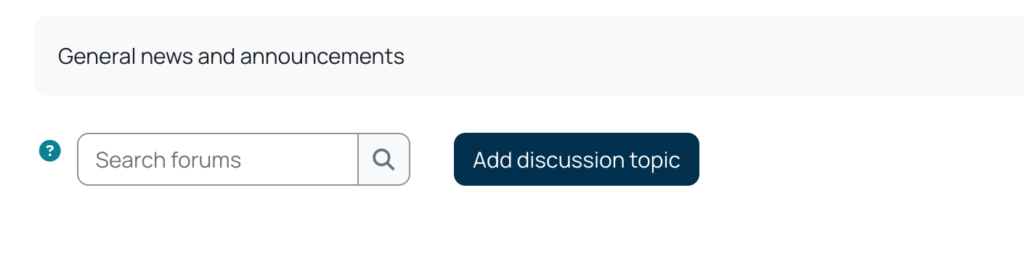
To send an email via this method, click on your Announcements link, then click Add discussion topic

Fill in your subject and message.
If you do not have any attachments, you can click post to Forum, this will then save it to the announcements forum, and send it as an email 30 minutes later (during which time you can edit your email)
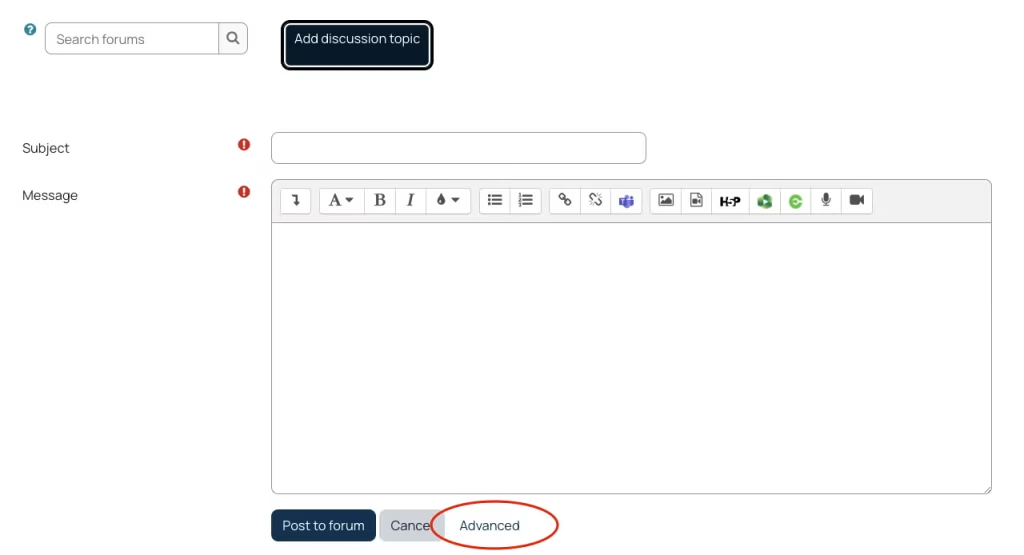
If you wish to add any attachments or send the email immediately, click Advanced, you will be able to then either drag and drop your file or click the paper icon above files to navigate to it
If this is an important message that you want to always appear at the top then tick the Pinned box
By default it will post to the forum but not send an email for 30 minutes, this allows you time to edit the post before it emails to all the Participants. If you wish the email to be sent immediately the tick the Send forum post notifications with no editing-time delay box. Then click Post to Forum, this will post to the forum and send an email to all of the participants. although this uses a Forum activity, it is set to be one way communication only and students cannot reply to messages.
Using Announcements to Email the wider department through the Departmental page
If you want to send an email to everyone in the department, year groups or all departmental staff or all departmental students then send your message from the departmental page. If you want to send a message to a module cohort, use the module page.
In Departmental Moodle pages you can also choose the groups you want to send the email to, ‘All participants’ is the default but you can click on the drop down and select by staff or student or year groups.
You will not have this choice in individual Module pages
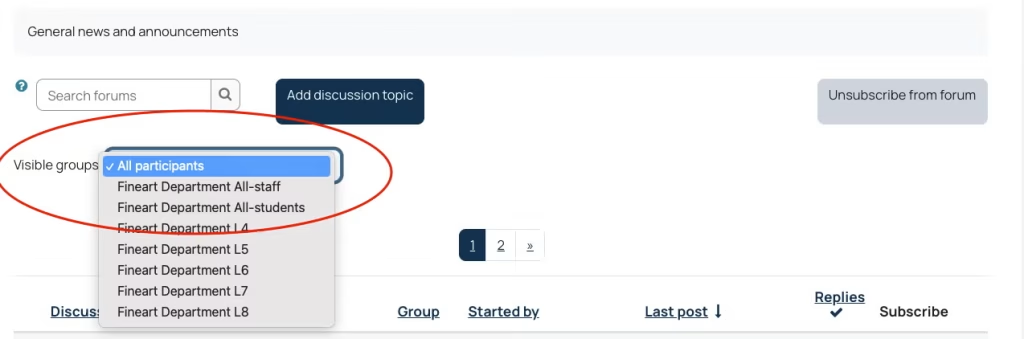
Once you have selected the group you wish then click Add discussion topic.
You will then be able to fill in the subject of your email, then fill in the message, then add any attachments you want to send as usual.
Getting started with your Moodle page
Let’s understand the basics! #
Moodle is a versatile tool, and there are many different things you can do with it.
The video below shows the basics:
- How the page is laid out
- How to import content using a blue box
- How to move items around
- How to add an activity or resource
- How to add a file
- Editing a topic heading
- Editing a text box
Watch the Basic editing in Moodle video here
Moodle Minimum Requirements
Moodle Minimum Requirements #
In November 2019, the Learning and Teaching & Student Experience Committee agreed a minimum standard for all Moodle module pages. This is to ensure quality, accessibility and consistency for students working on campus, online, and blended.
Page layout
As you’re adding the module content, we recommend keeping the top (General) section for important module information. Too much information here can make things hard to locate for your students. Here is how we would suggest you lay out this information:
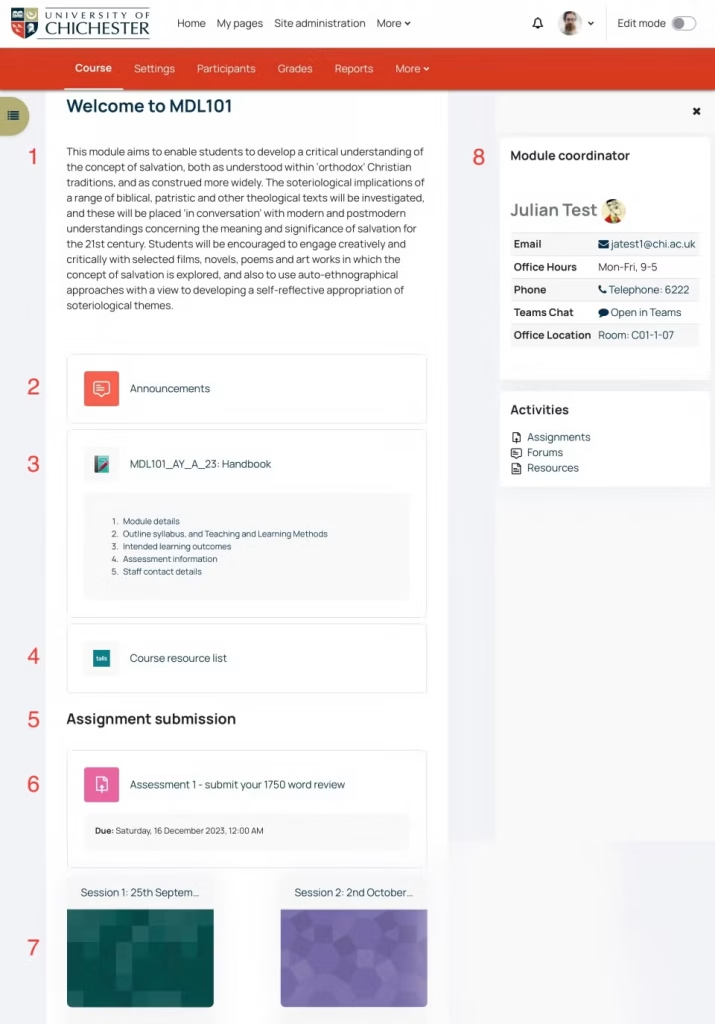
- This is your chance to introduce your students to the module
- The Announcements activity will automatically be on each page. Use this to send out emails to the students
- The module handbook resource can be used to display all essential module information
- Use Talis ChiReadingList to link to the module’s reading lists
- You can use a Text resource to add headings to the page, making it easier to find information throughout the page
- Assignment submission areas can be used for collecting written and multimedia assignments
- Choose whether to display your sessions as Grid format (as shown here) or as Topic format (all information listed down the page)
- The module coordinator block will appear here automatically
Each Moodle module page is expected to have the following:
Note: Guidance for meeting the following requirements is shown further down this page.
1. Module information #
Most of this information can be taken from your module descriptor and added to the Moodle Handbook resource
- Module synopsis (add this short paragraph to the top of the Moodle page)
- Module learning outcomes (consider also adding the module key skills/employability skills)
- Module syllabus
- Assessment overview
2. Staff contacts #
- Details of staff teaching on the module
- Contact information
- Office hours (when are you available for contact. Especially important if you are not full-time)
Some of this information will appear automatically in Moodle’s Handbook resource, displaying the information for those enrolled with Module Coordinator and Lecturer roles. You will also now see the Module Coordinator information appear in a block on the right of each Moodle page.
3. Module content #
- Title, structure and outline for each teaching session
- Make sure all learning materials for each session are in an accessible format (please make sure you’re familiar with the Government Digital Accessibility Regulations)
- Lectures as recorded videos, where available (These should comply with our Lecture Recording, Data Protection, and Accessibility policies)
4. Assessment and feedback #
- Detail of individual assessment (formative and summative)
- Assessment task
- Submission instructions & electronic submission points (e.g. Assignment Activity). We advise that you add the Assignment submission link at the top of the page and make sure that it is clearly labelled, for example, “Submit your (name) assignment here“
- Assessment and feedback calendar & deadlines (Clearly state when due dates are and when feedback can be expected. If feedback dates shift, make sure you communicate this with your students)
- Referencing guidelines for students, including advice of academic integrity (consider linking to the relevant resources on the Study Skills Moodle page and to the Academic Malpractice guidance in the Student Handbook)
5. Resources #
- ChiReadingList (Talis) (You can use this to list your reading lists, journals and other resources. Your subject librarian can support you with this)
- Announcement activity, previously called the News Forum (This is essential for quickly contacting all students on the module)
6. Student engagement #
- Module makes use of interactive online activities, such as Moodle discussion forums, pop quizzes, votes, etc. (useful for asynchronous engagement with students outside of teaching time)
- Centralised module evaluation (the new guidance for annual module evaluation will be announced early in the new academic year)
Guidance #
Module description
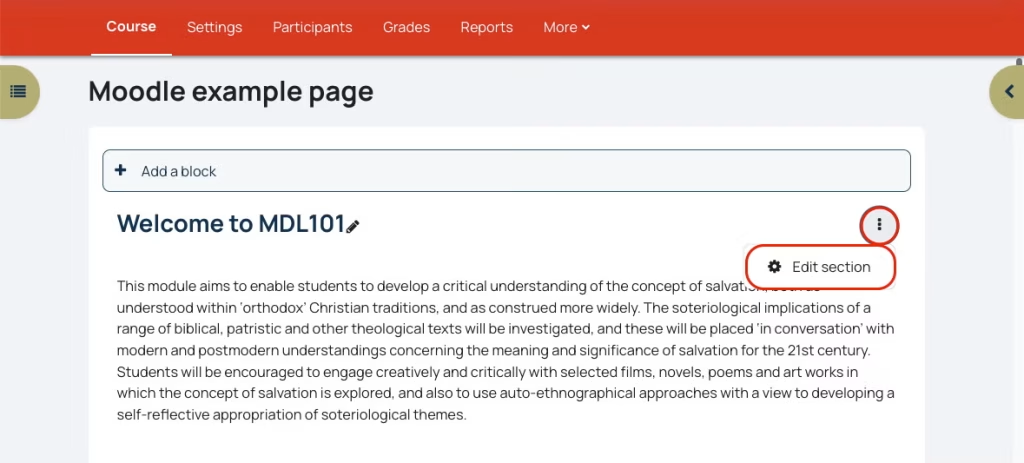
Copy the Module description (taken from the descriptor) into the top of the module page (in the General section)
With editing turned on this will be the edit option nearest to the top of the page, click Edit and then Edit section
Handbook activity #
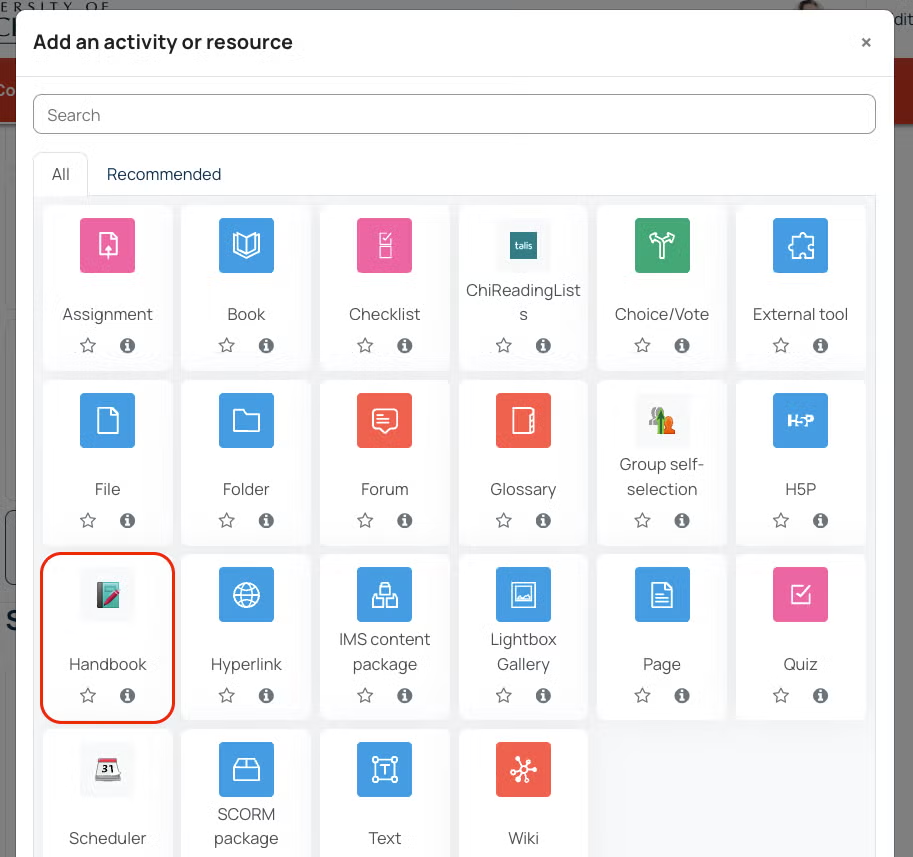
Click Add an activity or resource in the top section and select Handbook from resources:
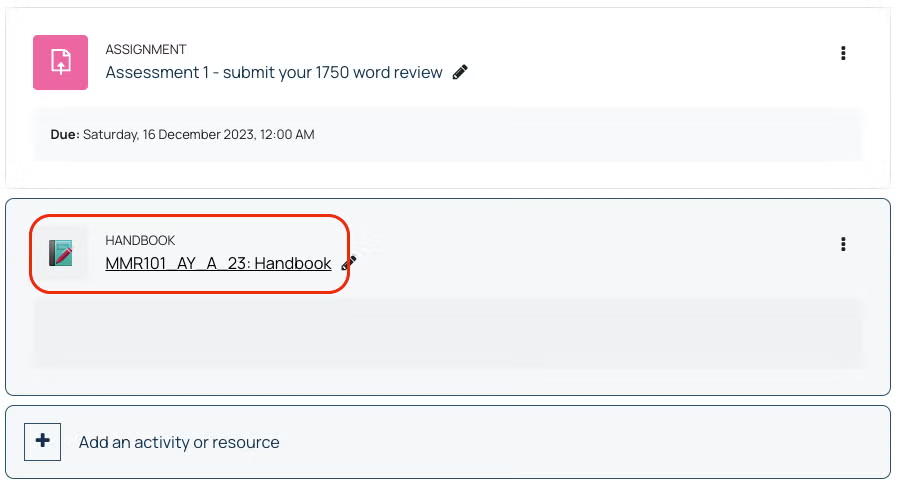
You will then be taken to the handbook settings, these will automatically be done for you so just click save and return to course.
Click on the Handbook to edit the elements of it
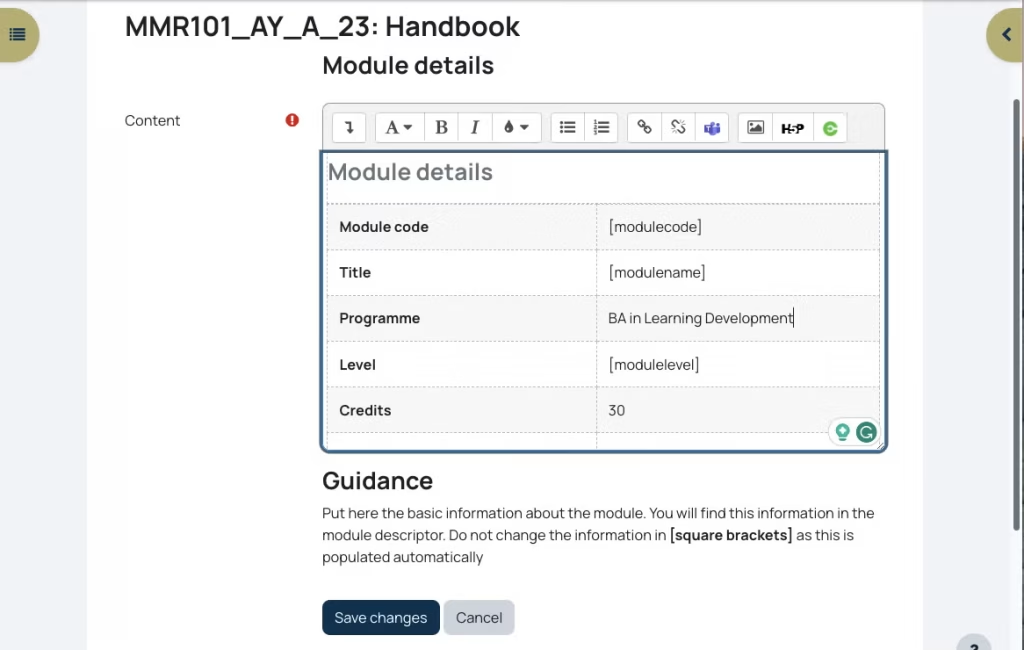
The first element is Module details, the module code and title will be pre-populated. Open the blocks drawer to display the Table of contents. To edit each section, click on the cog icon next to the page title.
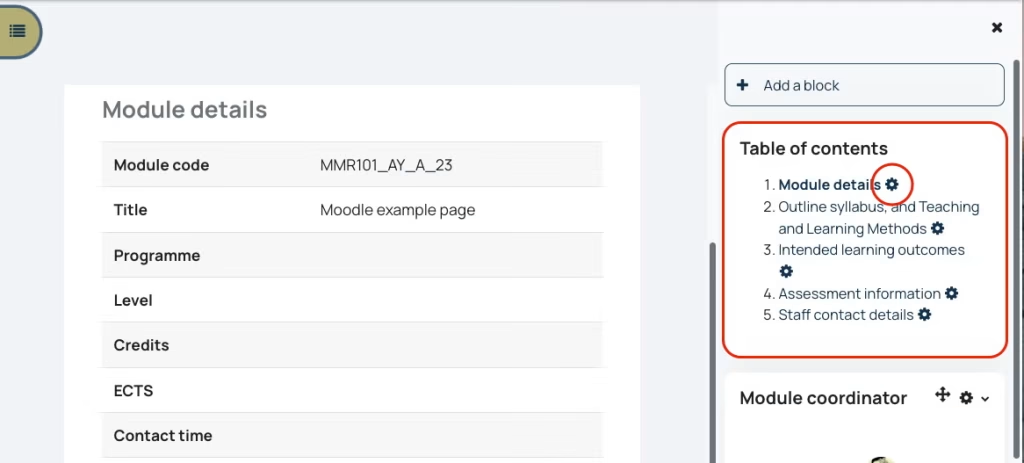
Copy and paste the rest of the information from each line of the module descriptor into the table cells, and click save changes. Do not change any fields that have text with [ ] around it as these are elements that get automatically populated.

Continue to work through the remaining Handbook pages, clicking on the cog icons to edit each one:
- Outline syllabus, and Teaching and Learning Methods
- Intended learning outcomes
- Assessment information
The Staff contact details page will automatically be populated with the details of anyone enrolled as module coordinator or lecturer. You can update your profile information, to include an image, office location and office hours, by following this video guide: update your profile information
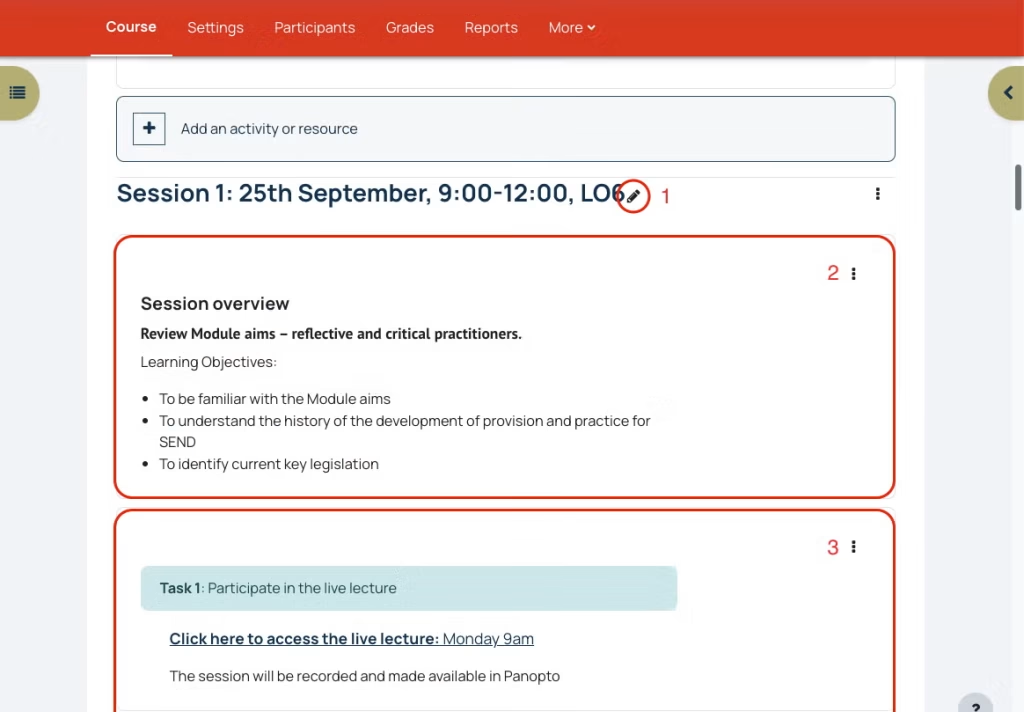
Details of each session/week. #
Including when, where, and what is being looked at in each section.
- You can edit the section headers by selecting the edit “pen” icon
- You can use Text resources (via Add an activity or resource) to add sections of text to the page to, for example, explain what will be happening each session.
- You can add multiple Text resources, making it easier for you to move them around the page.
Additional considerations
Module evaluation: If your module has previously been evaluated by students, please add information about this so that current students can see how the module has developed over time.
Accessibility: It is now a legal requirement that all learning materials be accessible to users. This could mean that; documents must be formatted in a specific way, that images, audio and video be updated to be accessible to those with impairments, that pages are formatted in a specific way, etc. For guidance on digital accessibility, please see our Digital Accessibility for Content Creators guide on the help site, or email us TEL@chi.ac.uk
Moodle page settings
Moodle page settings #
Your Moodle page settings includes things such as:
- Changing your course start and end date
- Change your course image (visible when searching for a module and in My Pages)
- Changing between a Topics and a Grid view
- Change the maximum file upload size
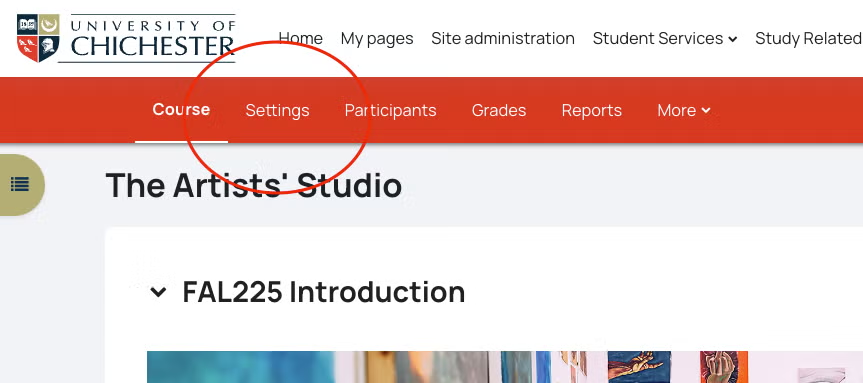
Access the course settings by clicking on Settings in the red menu bar at the top of the page
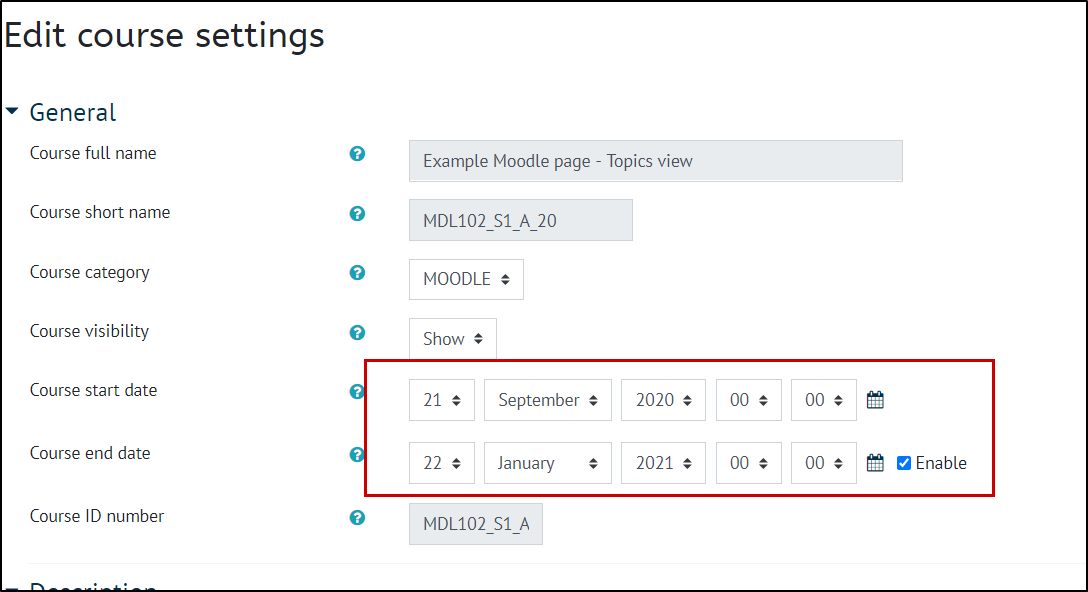
Changing your course start and end date
If your course does not follow standard semester dates you can change the dates here to ensure that the course shows as In progress during the appropriate times
Change your course image
Scroll down the settings page and under Module summary images you can change the module picture
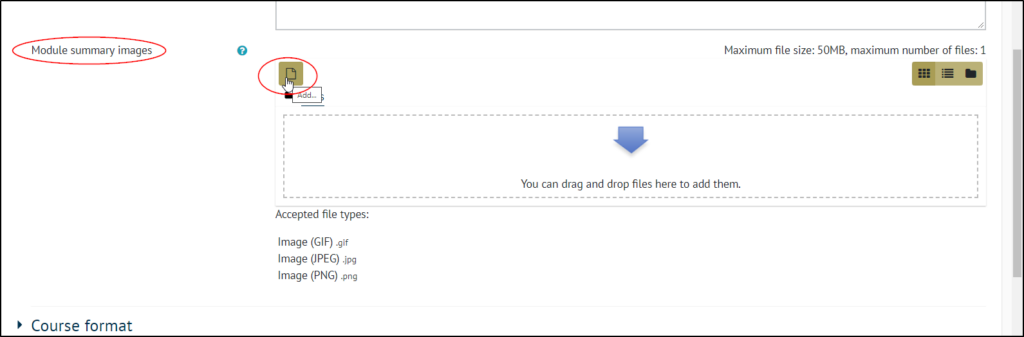
this will change the picture which is visible from your My Pages area and when people are searching for modules.
Changing module page layout format
Underneath the module summary image you can then find the Course Format section, this is where you can choose between the default Custom sections and the more compressed Grid view.
- Custom sections format will show all the topics or sections on the page, and you can scroll down the page to see more
- Grid format shows each topic or section in grid, you can add your own images or leave the default colours
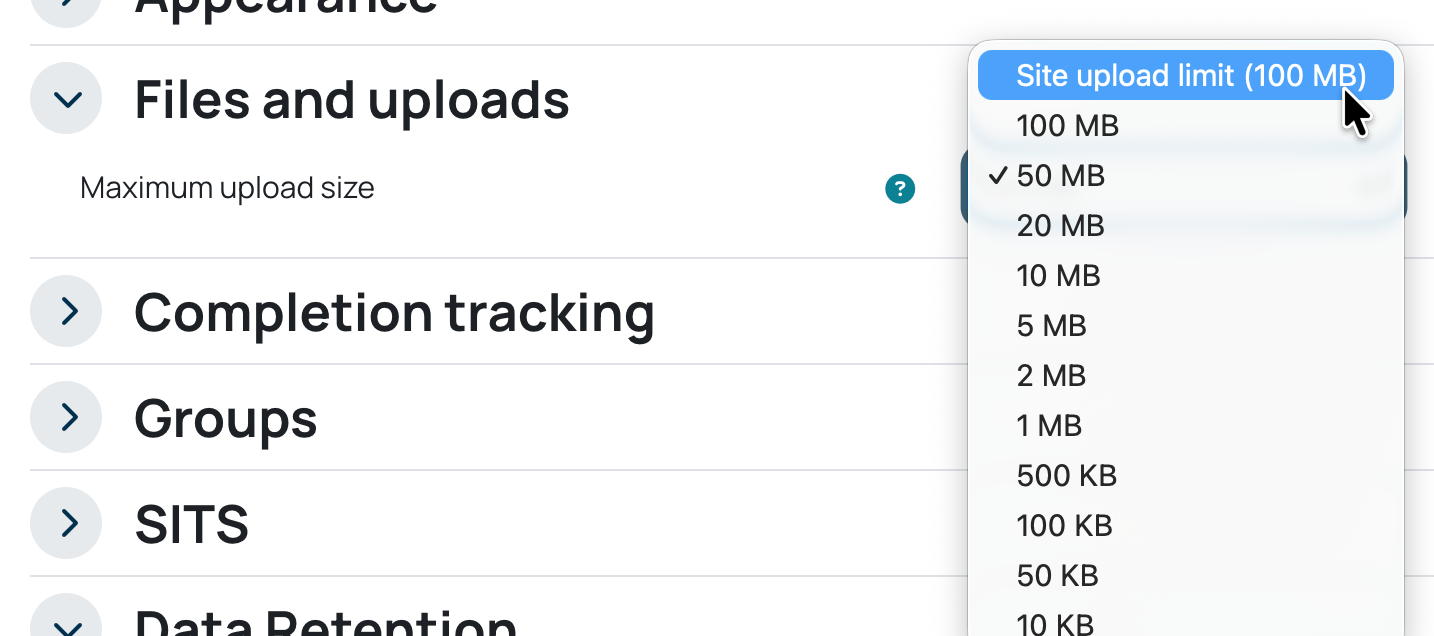
Change the maximum file upload size
By default, users should be able to upload files up to 100MB in size. Some older Moodle pages may have a lower limit set.
To check/update this, scroll quite far down the settings and you will find the Files and uploads section, you can change the maximum file upload size.
Once you have made any changes to the Page settings that you want to, scroll to the bottom of the page and click Save and Display
Moodle Activities and Resources
Moodle has a number of activities and resources available to be used, here is an overview of the ones you may need.
Resources
Book
The book module enables you to create a multi-page resource in a book-like format, with chapters and subchapters. Books can contain media files as well as text and are useful for displaying lengthy passages of information which can be broken down into sections.
A book may be used
- To manage complex course material organised by chapter
- To allow students to download and print
- As a showcase portfolio of student work
File
This option allows you to make a file available to your students to access, prompting them to download it.
Note that students need to have the appropriate software on their computers in order to open the file.
A file may be used:
- To share PowerPoint slides
- To share lesson handouts
- To provide draft files of certain software programs (eg Photoshop .psd) so students can edit and submit them for assessment
Please make sure that all shared files comply with digital accessibility regulations
Folder
Folders can be added to display a number of related files inside a single folder, reducing scrolling on the module page. A zipped folder may be uploaded and unzipped for display, or an empty folder created and files uploaded into it.
A folder may be used:
- For a series of files on one topic, for example, a set of past examination papers in pdf format or a collection of image files for use in student projects
- To provide a shared uploading space for teachers on the course page (keeping the folder hidden so that only teachers can see it)
Handbook
The Learning & Teaching and Student Experience Committee has defined a minimum requirement for all Moodle module pages.
The Handbook resource includes the following sections:
- Module details (pasted from the descriptor)
- Outline syllabus and teaching and learning methods (pasted from the descriptor)
- Intended learning outcomes (pasted from the descriptor)
- Assessment information (pasted from the descriptor)
- Staff contact details (some of these will be automatically generated)
Hyperlink
Hyperlinks enable lecturers to provide a web link as a course resource. Anything that is freely available online, such as websites, documents or images, can be linked to; the URL doesn’t have to be the home page of a website. The URL of a particular web page may be copied and pasted or a teacher can use the file picker and choose a link from a repository such as Flickr, YouTube or OneDrive.
Note that hyperlinks can also be added to any other resource or activity type through the text editor.
Lightbox Gallery
The Lightbox Gallery resource module enables participants to view a gallery of images.
This resource allows you to create ‘Lightbox’ enabled image galleries within your Moodle course.
As a course teacher, you are able to create, edit and delete galleries. Small thumbnails will then be generated, which are used for the thumbnail view of the gallery. Clicking on any of the thumbnails brings that image into focus, and allows you to scroll through the gallery at your leisure. Using the Lightbox scripts creates nice transition effects when loading and scrolling through the images.
If enabled, users are able to leave comments on your gallery.
Page
The page resource enables you to create a web page resource using the text editor. A page can display text, images, sound, video, web links and embedded code, such as Google maps.
Advantages of using the page module rather than the file module include the resource being more accessible (for example to users of mobile devices) and easier to update.
For large amounts of content, it’s recommended that a book is used rather than a page.
A page may be used
- To present the terms and conditions of a course or a summary of the course syllabus
- To embed several videos or sound files together with some explanatory text
ChiReadingList
The ChiReadingLists allows users to access an interactive list of their module resources and gives instant access to any online resources such as online articles and eBooks.
All modules must have a ChiReadingList to comply with the Moodle Minimum Requirements.
You can add multiple views on your Moodle page, highlighting the weeks reading for students in each week section of the module page.
For further guidance on creating/editing your ChiReadingLists please contact your Subject Librarian to arrange a training session. Alternatively, please visit the ChiReadingLists Training Moodle for step by step guidance and video tutorials.
Text and Media area
Use this to add text to your Moodle page, adding information of giving headings to lists of resources. You can also use the Text option to embed HTML onto your module, such as videos, Google Maps, Twitter feeds by pasting in HTML/iframe embed code into the “< >” button.
The text area may be used:
- To split up a long list of activities with a subheading or an image
- To display embedded content, such as video, Google Map, Twitter feed etc. on the course page
- To add a short description to a course section
The Text box works in the same way as the text editor on a section, however it can be moved around the page and sits in between resources, so it is advised to use this rather than the text editor on a section.
Activities
Assignment
The Moodle assignment activity enables a teacher to communicate tasks, collect work and provide feedback.
Students can submit any digital content (files), such as word-processed documents, spreadsheets, images, or audio and video clips. Alternatively, or in addition, the assignment may require students to type text directly into the text editor. An assignment can also be used to remind students of ‘real-world’ assignments they need to complete offline, such as art work, and thus not require any digital content. Students can submit work individually or as a member of a group.
Although there is a grade function in Moodle, it is not to be used for summative assignments. All feedback is recorded via MAF – More information can be found on the MAF help pages.
Please note that all written summative assessments need to have the Turnitin plagiarism plugin settings enabled (it is enabled by default).
Please see the Online Assignment help pages for more information.
Checklist
The checklist activity allows a teacher to create a checklist / to-do list / task list for their students to work through.
Checklists can be used to control access to additional resources or activities. For example, a student can only see the Powerpoint slides if they have 100% on their checklist.
Choice/vote
The choice activity enables a teacher to ask a single question and offer a selection of possible responses.
Choice results may be published after students have answered, after a certain date, or not at all. Results may be published with student names or anonymously.
A choice activity may be used:
- As a quick poll to stimulate thinking about a topic
- To quickly test students’ understanding
- To facilitate student decision-making, for example allowing students to vote on a direction for the course
Forum
Forums have many uses, such as:
- A social space for students to get to know each other
- For course announcements (using a news forum with forced subscription)
- For discussing course content or reading materials
- For continuing online an issue raised previously in a face-to-face session
- For teacher-only discussions (using a hidden forum)
- A help centre where tutors and students can give advice
- A one-on-one support area for private student-teacher communications (using a forum with separate groups and with one student per group)
- For extension activities, for example ‘brain teasers’ for students to ponder and suggest solutions to
See the Moodle Forum help page for more information
Glossary
The glossary activity module enables participants to create and maintain a list of definitions, like a dictionary, or to collect and organise resources or information.
A teacher can allow files to be attached to glossary entries. Attached images are displayed in the entry. Entries can be searched or browsed alphabetically or by category, date or author. Entries can be approved by default or require approval by a teacher before they are viewable by everyone.
A teacher can allow comments on entries. Entries can also be rated by teachers or students (peer evaluation). Ratings can be aggregated to form a final grade which is recorded in the gradebook.
Glossaries have many uses, such as
- A collaborative bank of key terms
- A ‘getting to know you’ space where new students add their name and personal details
- A ‘handy tips’ resource of best practice in a practical subject
- A sharing area of useful videos, images or sound files
- A revision resource of facts to remember
Group self-selection
Lets participants create and select groups. Features:
- Participant can create groups, give them a description and set them password protected, if wanted
- Participants can select and join groups
- Supervisors may be assigned to groups
- Teacher can export course group list as a csv-file
- Full compatibility with basic Moodle groups: groups may be created by other means if needed, supports group assignment submissions etc.
H5P interactive Content
The H5P activity enables you to create interactive content such as Interactive Videos, Question Sets, Drag and Drop Questions, Multi-Choice Questions, Presentations and much more.
In addition to being an authoring tool for rich content, H5P enables you to import and export H5P files for effective reuse and sharing of content.
User interactions and scores are tracked using xAPI and are available through the Moodle Gradebook. Note that it is currently possible for people with programming skills to cheat in H5P interactions and obtain the full score without knowing the correct answers. H5Ps must not be used for exams or similar.
You add interactive H5P content by creating content using the built-in authoring tool or uploading H5P files found on other H5P enabled sites.
For more information see the H5P content in Moodle for advanced users help page
Quiz
The quiz activity enables a teacher to create quizzes comprising questions of various types, including multiple choice, matching, short-answer and numerical.
The teacher can allow the quiz to be attempted multiple times, with the questions shuffled or randomly selected from the question bank. A time limit may be set.
Each attempt is marked automatically, with the exception of essay questions, and the grade is recorded in the gradebook.
The teacher can choose when and if hints, feedback and correct answers are shown to students.
Quizzes may be used
- As mini tests for reading assignments or at the end of a topic
- As exam practice using questions from past exams
- To deliver immediate feedback about performance
- For self-assessment
Please note that Moodle quizzes should be used only for formative assessment and not as a summative test or a replacement for an exam
Scheduler
The scheduler activity helps you in scheduling appointments with your students.
Teachers specify time slots for meetings, students then choose one of them on Moodle. Teachers in turn can record the outcome of the meeting – and optionally a grade – within the scheduler.
Group scheduling is supported; that is, each time slot can accommodate several students, and optionally it is possible to schedule appointments for entire groups at the same time.
Scheduler activities may be used for:
- For booking tutorial slots
- For arranging seminars times
Scheduled appointments show up on your Moodle calendar, which you can import into your Outlook calendar (though it will appear as a separate calendar, and you won’t be able to push appointments from Outlook to Moodle).
For more information see the Schedule Tutorials help page
Set up an Assignment in Moodle
Type of assessment
Below, you will find guidance on setting up a submission area for a written assignment. These are a maximum of 100MB and are (by default, limited to the following file types:
- OpenDocument Text document .odt
- PDF document .pdf
- Powerpoint 2007 presentation .pptx
- Powerpoint presentation .ppt
- RTF document .rtf
- Word 2007 document .docx
- Word document .doc
If your assignment requires larger file types, for example, video or multimedia PowerPoint document, please follow this guide: Video/Multimedia assignments guide
- Click on add an activity or resource at the end of the section you want it to appear in
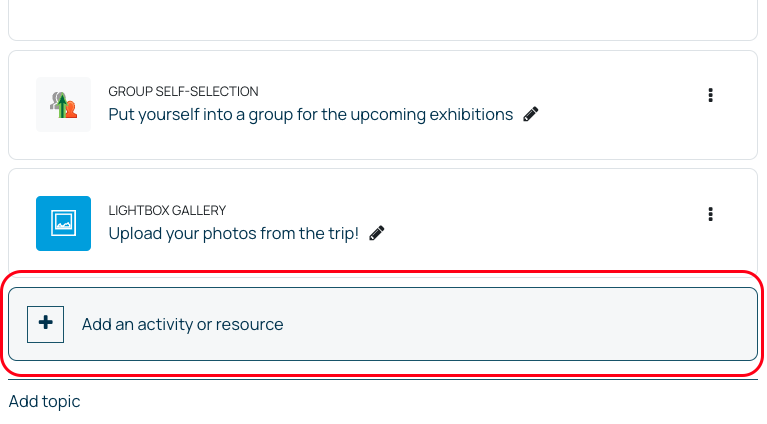
- From the activity list, select Assignment
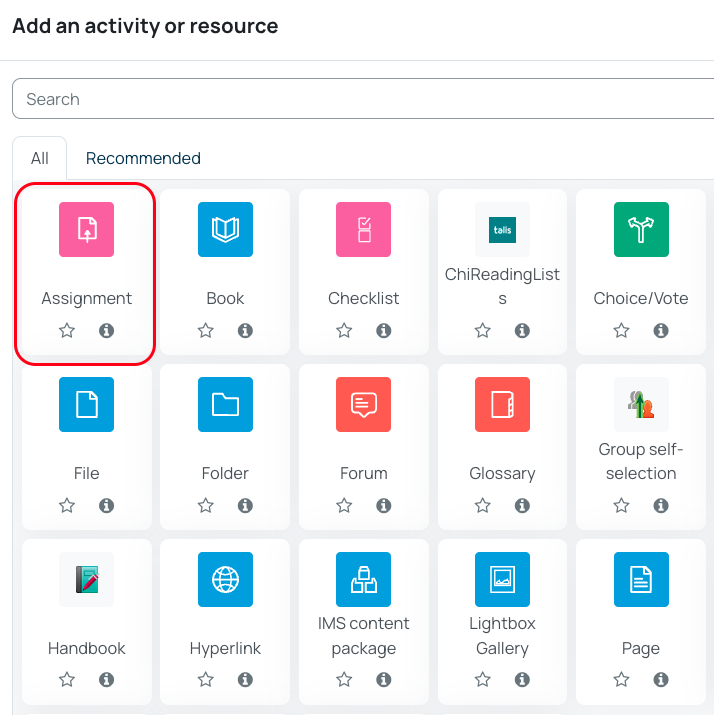
- Give the assignment a name and add a Description and/or Activity instructions if needed. A description can be made to be visible on the Moodle page, whilst activity instructions will appear for the student in their submission screen
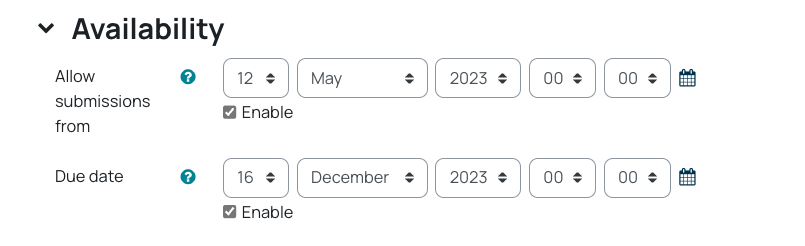
- Under Availability, add the submission’s due date and due time
- Optional – Under submission type, file submission is selected by default. Also by default, the maximum number of files allowed for submission is set to 20. Change this if you want to limit the number of files each student can submit
- Optional – Under accepted file types, the default assumes you will want to use Turnitin. This restricts students to submitting particular file types e.g. PDF*, Word, PowerPoint.
- If you want students to upload a specific file type, or you want to leave it open, select ‘choose’ then add different file types (or select ‘all file types’). Turnitin will ignore anything it can’t read, but the file will still be available to you for downloading
- If you want to complete feedback through annotation on Microsoft Word, you may want to unselect everything except Microsoft Word (.doc, .docx). This will force students to submit in your required file type
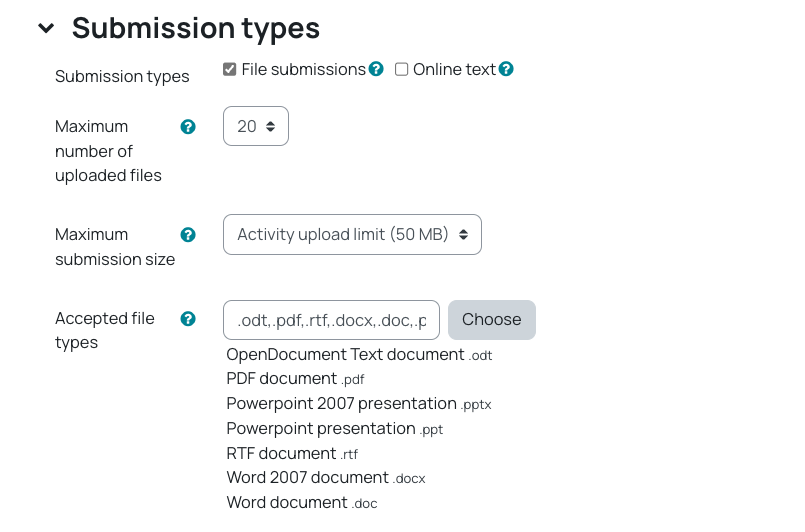
- When you have made your selections, scroll to the bottom of the ‘Accepted file types’ window and click Save Changes
- Optional – Under group submission types, there is an option for group work (these are covered in the how to set up a group submission guide)
- Optional – Under the Turnitin plagiarism plugin section, Turnitin is on by default. In certain situations you can turn it off through the ‘Enable Turnitin’ option e.g. if students need to submit something other than essay files such as consent forms etc.
- Once you have made your selections on the ‘student tasks’ page, click Save and return to course
Back on your Moodle page you will see the submission link with this icon.

How to View Assignments
- Click the Assignment activity on the Moodle module page
- On the Grading summary page, you will see the number of submissions expected and received
- Select Submissions in the red menu along the top of the page
- You are able to see: the student number, the last time they submitted or made a change to the submissions, the submitted file, and the Turnitin information (the originality report).
Clicking on the similarity percentage opens the report. A late submission is shown by a highlighted time in the status column - If Anonymous marking is enabled (default). This removes the student photo, name, and email
- Department Administrators see a different view, which includes the student photos, names, and email addresses
- To grant an extension to a student:
- Identify the student using their Student No.
- Click the submission link on the Moodle module page
- Click the view all submissions button to see more information
- Identify the student using their student number
- Click edit and select grant extension
- Amend the extension due date and time
- Save the changes
- Back on the submission page, the extension shows in the status column
- Navigate to the Assignment activity on the Moodle page
- Select Submissions to veiw list of students
- Tick the Quick grading box
- Select users using their individual tick boxes in the Select field of the table. To select all student, use the tick box at the top of the table
- At the bottom of the page, select the Lock icon
To Unlock, repeat the steps above and select the Unlock icon
Allocating markers to submissions
If you wish to allocate certain submissions to specific markers, to do this:
- On your Moodle page, select the submission link, and then select Settings from the red menu bar
- Under the Grade heading, you should see ‘Use marking allocation‘, turn that on and click Save and display at the bottom of the page
Once that it is enabled, when you view all submissions, you can choose who needs to mark which students’ work
- At the top of the page, you’ll see a tick box called Quick grading. Make sure this has been ticked
- This will reload the page, displaying additional options and columns
- You’ll see a Markers column, with a dropdown listing the lecturers on the module, for each student
Understanding roles in Moodle
There are a number of key roles in Moodle. These are:
Module coordinator role
The Module coordinator has overall responsibility for the module. However they may not necessarily be the person or people delivering the module if there is more than one lecturer or if they are overseeing associate lecturers.
New Moodle pages are created for each module occurrence each year, each page will have one person automatically enrolled, this is the module coordinator. Please make sure that ChiView has been updated with any changes to module coordinators (more information on Module Coordinator Updates). Those who are recorded as module coordinators will automatically get access to the Moodle page and MAF Online.
Lecturer role
The lecturer role is for anyone teaching on a module who needs to edit the page and is not the module coordinator.
Those with a lecturer role can add other lecturers onto a page, but non-editing lecturers and external examiners must be done by the module coordinator.
Non-editing Lecturer
The non-editing lecturer role is for anyone teaching on a module but who does not need to edit the page.
External examiner
This role is for the external examiners who need to see the module pages, please note they will also need adding to the module in MAF.
The above roles are for staff only, if a PhD student is lecturing on a module, please contact TEL@chi.ac.uk
Student role
Students are enrolled onto pages according to the modules they registered to take. If students do not have access to a page they are expecting, contact modular@chi.ac.uk to check their registration, students should not be manually added to course pages.
If there are several groups for a module with different pages, (e.g. A, B etc.) and the department wants students in certain groups, then the department needs to advise modular who should be added to which group occurrence.
Contact modular@chi.ac.uk if a student is not enrolled on a page and should be. Students should never be manually added to a Module page
If you need access to a page but are not the module co-ordinator, please contact your module co-ordinator to add you. If you are unsure who that is, contact tel@chi.ac.uk and we can let you know.
If you are unable to contact your module co-ordinator, some departmental administrators are able to add tutors to modules.
RA Lecturer or RA student (restricted access)
The RA lecturer or student role is for academic partner lecturers for those institutions who have restricted access to our systems.
Rollover guidance
Rollover content from a previous page
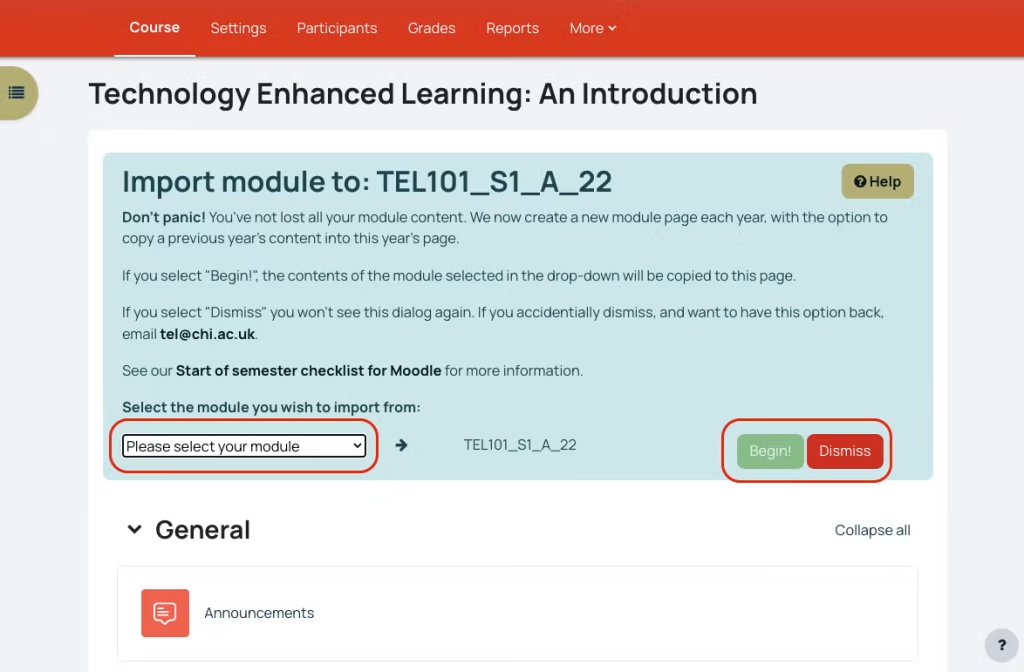
Importing using the ‘Blue Box’ #
The blue box will be on new pages. You can only import previous year content for that module code using the blue box. If you do not wish to import using this method, or you want to start your pages from scratch you can click Dismiss to get rid of the box.
To import content from another occurrence of that module, make sure you select the module code you wish to import from (remember to check the full code including which group (A, B etc, whether it was S1, S2 or AY, and checking the year)
1. To import previous content, select the module occurrence from the dropdown menu. Make sure you select the correct one to import from; you may see pages from previous years (_21, _20, etc.) and different occurrences (A, B, IOW, etc.)
2. Once selected, click Begin
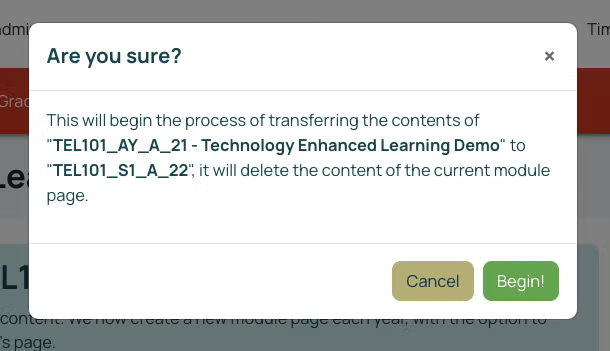
3. You will then get a pop up asking is you are sure. Double check the code again, and click Begin.
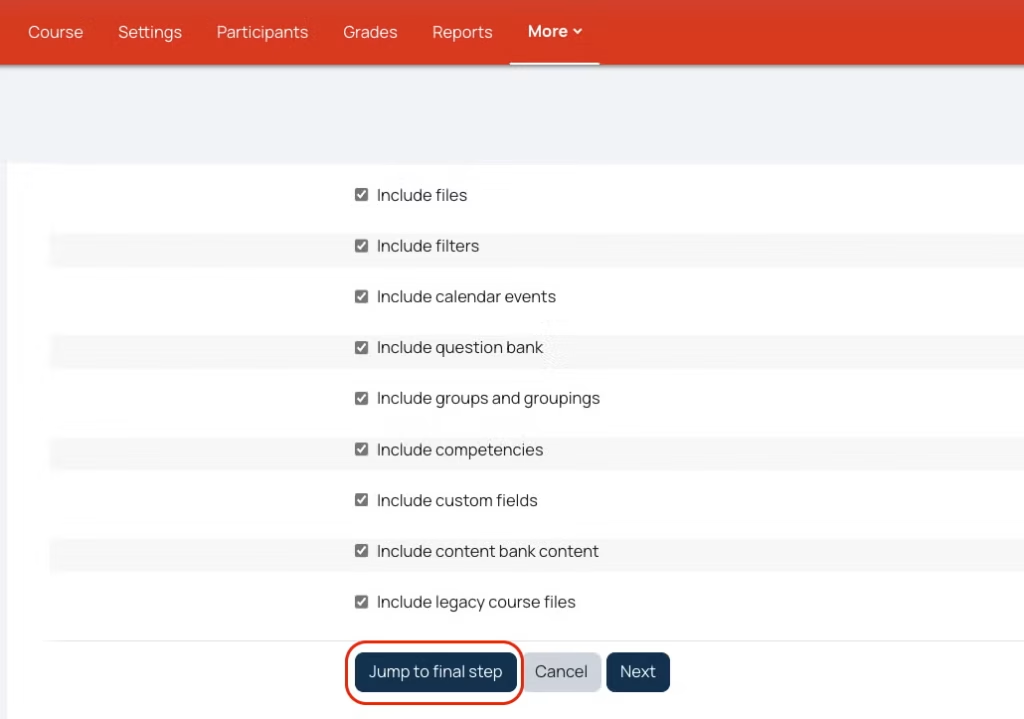
4. Scroll to the bottom of the next page and select Jump to Final Step. (If you want to choose for some of the content to not be imported, click Next to allow you to untick activities and resources so that they are not copied).
The content will then import. When it has finished, click Continue.
Rollover content from a different module code
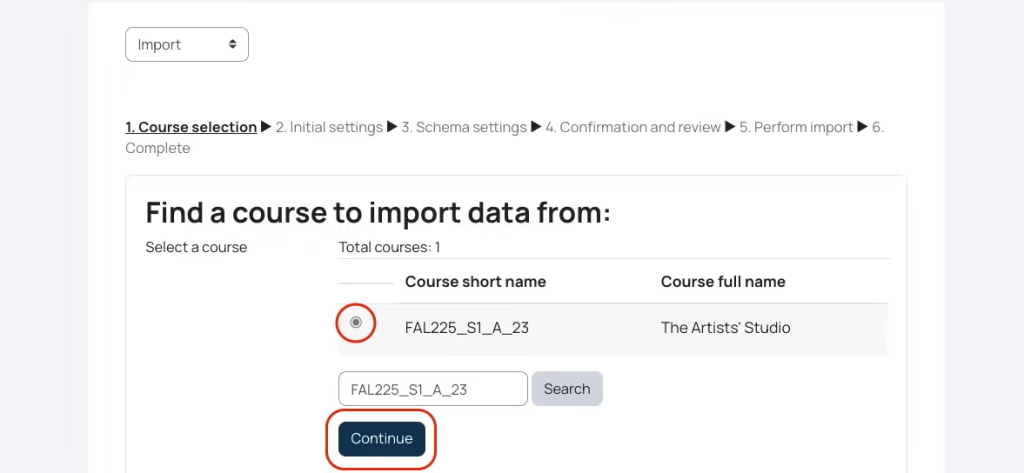
Importing using the Import function #
If you do not have a blue box, or the content you need to import is from a different module code or from the same year (eg copying S1 to S2) then you will need to use the Import function.
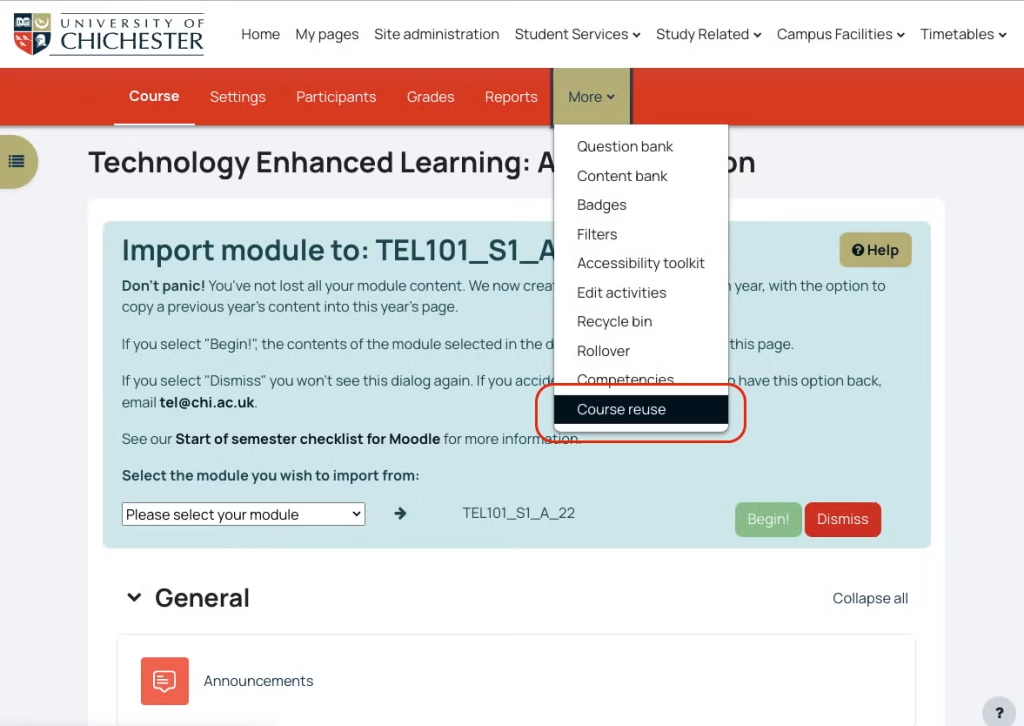
- In the red menu along the top of your page, select More
- Then choose, Course reuse
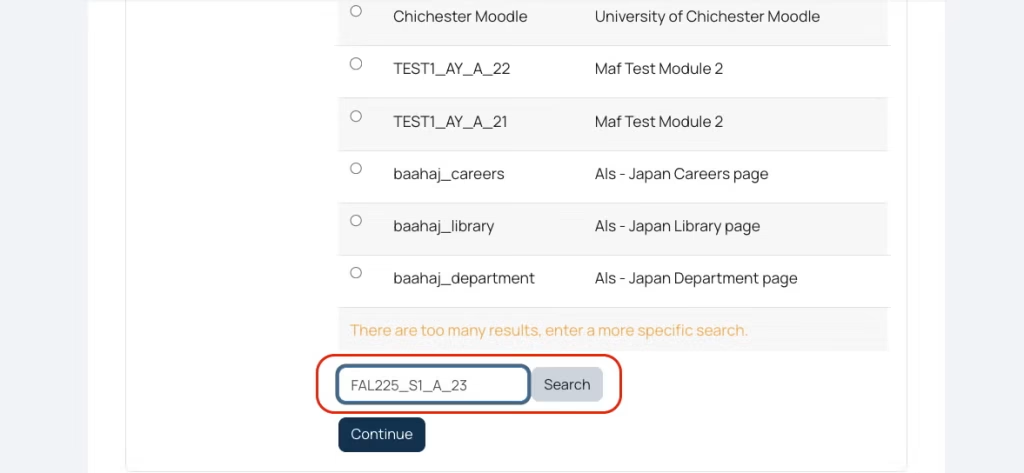
3. Make sure that the option is set to Import, scroll to the bottom of the page and search for the page from which you’d like to import
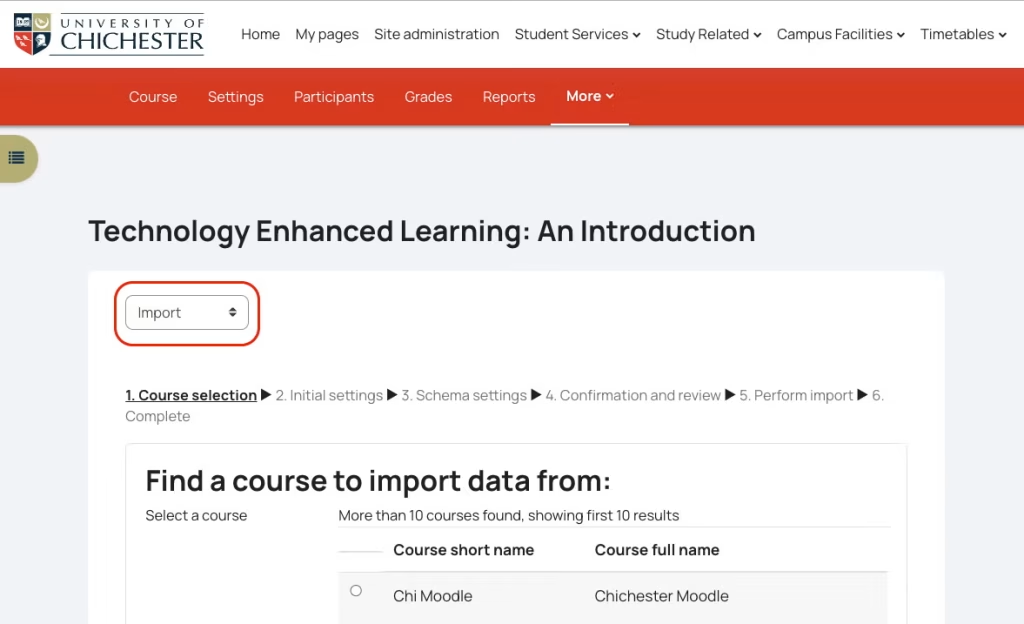
4. Select the correct module page from those displayed, and select continue
Select Jump to Final Step. (If you want to choose for some of the content to not be imported, click Next to allow you to untick activities and resources so that they are not copied).
The content will then import. When it has finished, click Continue.
Accessibility
Moodle Accessibility Tool
The Accessibility Tool in Moodle allows you to set the colour scheme, font style, readability and text size in Moodle. These settings apply only to you and do not affect how anyone else views the pages.
For more information, please go to its help guide:
Advanced options
Formatting buttons and highlighting information
Formatting buttons and highlighting information #
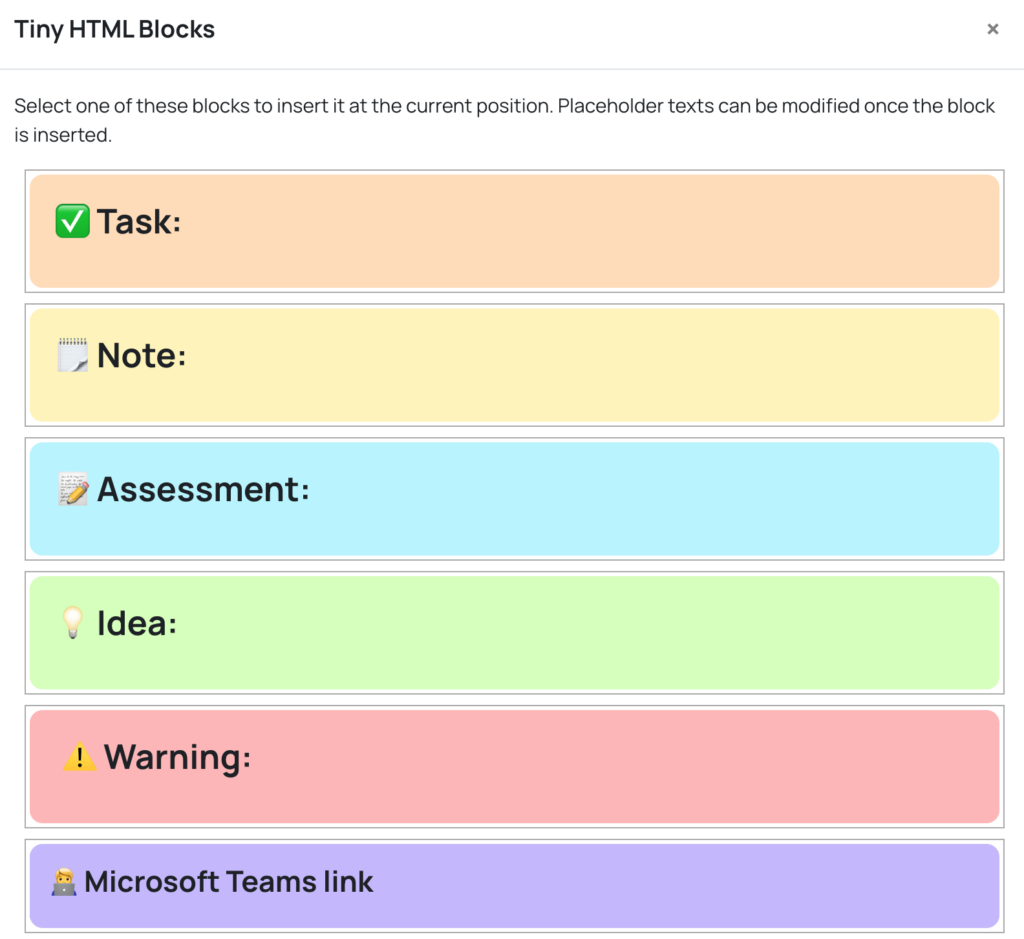
We’ve added some predefined HTML blocks that you can simply paste onto your pages.
These come in three types:
- Highlighter, to highlight information regarding Tasks, Notes, Assessment information, Ideas or Warnings
- A preformatted Microsoft Teams link
- A preformatted Button, which you can use in a similar way to a hyperlink
These options can be found in the Text editor:
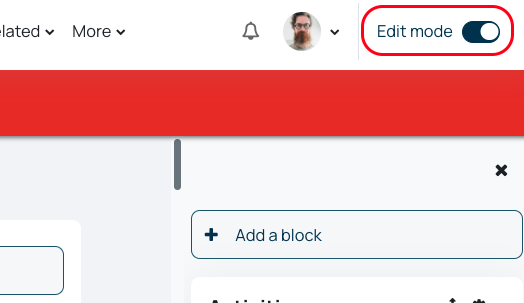
- Enable Edit mode
- Select to add a new Activity or resource
- Choose Text and media area
- Select the <HTML/> button in the text editor

Schedule tutorials in Moodle
Moodle has a host of time saving, and engaging activities and resources available for you to add to your Module page.
Scheduler allows you to quickly and easily setup, and manage your tutorial bookings, resulting in a space where students can book a tutorial slot with ease. The student also gets sent a reminder of the booked appointment!
Setting up your scheduler
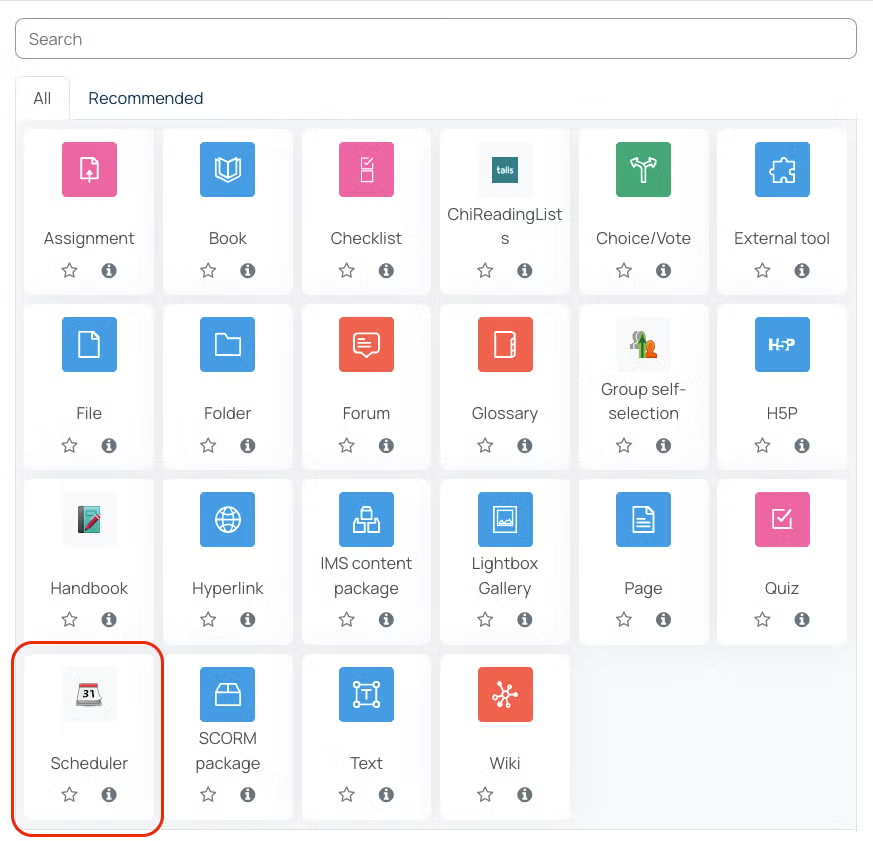
- To add a scheduler to your Moodle module, use the ‘add an activity or resource‘ function within the module page (Turn on editing and the option is under each topic) and select Scheduler
- You will then need to fill in the Name of your scheduler and can put an introduction if you wish (optional)
- Under options you will need to define the Role name of the teacher, this may be Tutor, Lecturer, Module Co-ordinator etc but is not their own name.
- You can then choose how many appointments you want students to be able to book as a maximum (1-10 or Unlimited) and whether they can book in groups.
- The Guard time prevents students from booking or cancelling their appointment within a certain time before the appointment. So for example, if it’s set for 2 hours, students cannot book in or cancel for 2 hours before the slot.
- You can choose a Default slot duration, but you can then change the duration of individual slots later on.
- When Notifications is enabled the lecturer and student will receive an email when slots are booked or changed (note students only receive notifications regarding their own slots)
- You can also choose whether or not to use the notes function in the scheduler, you can choose for notes to be visible to both teacher and student, just to the teacher or to have both types of notes.
- Click Save and return to course or save and display

Adding slots to your scheduler
In your scheduler, you can choose the add slots option
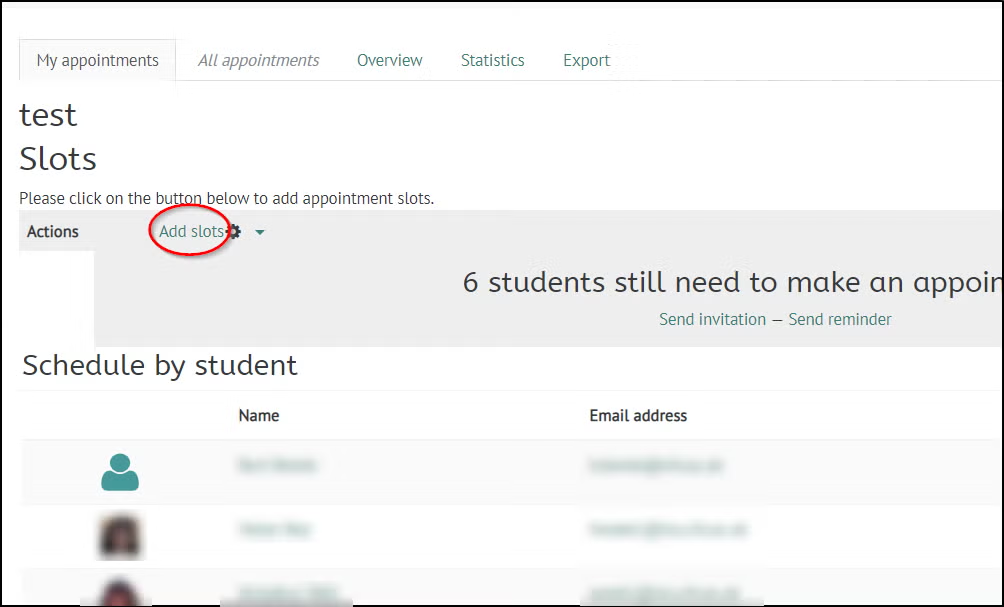
Then choose whether you want to add repeated slots or Single slots
You can then choose:
- your date range,
- which days,
- the time range
- duration of the slots if it is different from the default set when setting up the scheduler
- To have a break between slots if you want a buffer between the end of one slot and the start of another.
- Maximum students per slot
- Location
- The lecturer, this should default to your name, but if it doesn’t select your name from the drop-down box.
- whether to display all the slots now or a certain time before the slot (if you want to gradually release the slots)
- whether to email a reminder to yourself and the student before the slot
Click Save changes and your slots will appear. If you want to remove some for example to allow for a break, you can delete individual slots using the bin on the right-hand side of the slot, or amend individual slots using the cog.
If you require further support, guidance, or training on the effective use of schedulers, please contact the Technology Enhanced Learning team on tel@chi.ac.uk
Setting up Groups
How to set up a group #
Groups can be setup on a Moodle page, which will give you the options to make certain things available to individual groups, or to enable group submission of assessed work.
- Go to the top of the Moodle page in question and click Participants
- In the Enrolled users drop-down box, select Groups
- This brings us to the group set up page, on the left-hand side you have any groups you have set up and on the right-hand side we can add members
- The first thing we need to do is to create a group, click Create group, give your group a name and then a description if required
- Click save changes
- You will then see your first group in the list on the left
- You can then set up as many groups as you like in the same way
- To populate the group, click on your group, then on the right-hand side of the screen click add or remove users, it will then pull through all of the people enrolled on that module page.
- You can select a single user, or select multiple users by holding down the Ctrl key
- Then click add to add your selected users to the group
When you have populated your groups you can go back to the page.
Once the groups are set up it can be used anywhere on the page.
So, for example you could set up a forum for each group that only they can see and restrict the use of that forum to each group and Assignment hand ins can also be set by group.
Restricting access
Restricting access #
The restrict access feature enables lecturers to restrict the availability of any activity or even a course section according to certain conditions such as user, dates, grade obtained, group or activity completion.
For example if you need to set up an assignment link for specific students you can restrict it so that only those students can see it.
- With Edit mode enabled, find on the page the activity, resource or section you wish to add a restriction to
- Click on the … button and choose Edit settings

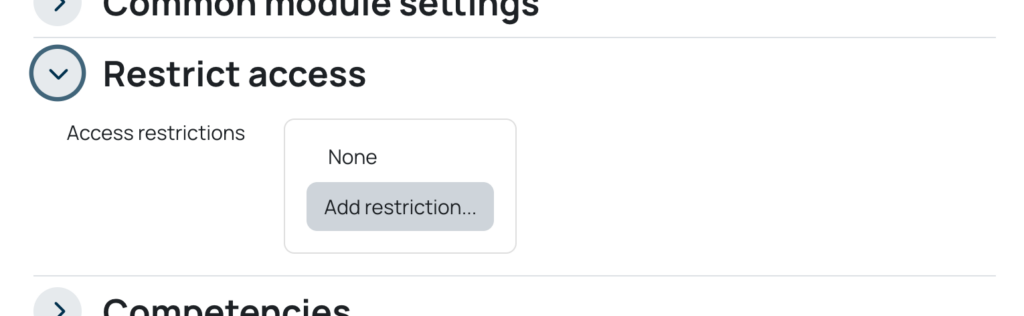
3. Scroll down to Restrict access
4. Select Add restriction
This will display the various settings that you can use in order to restrict a person or group

Select one of these to start.
For an example, I’ve chosen User profile (see below)
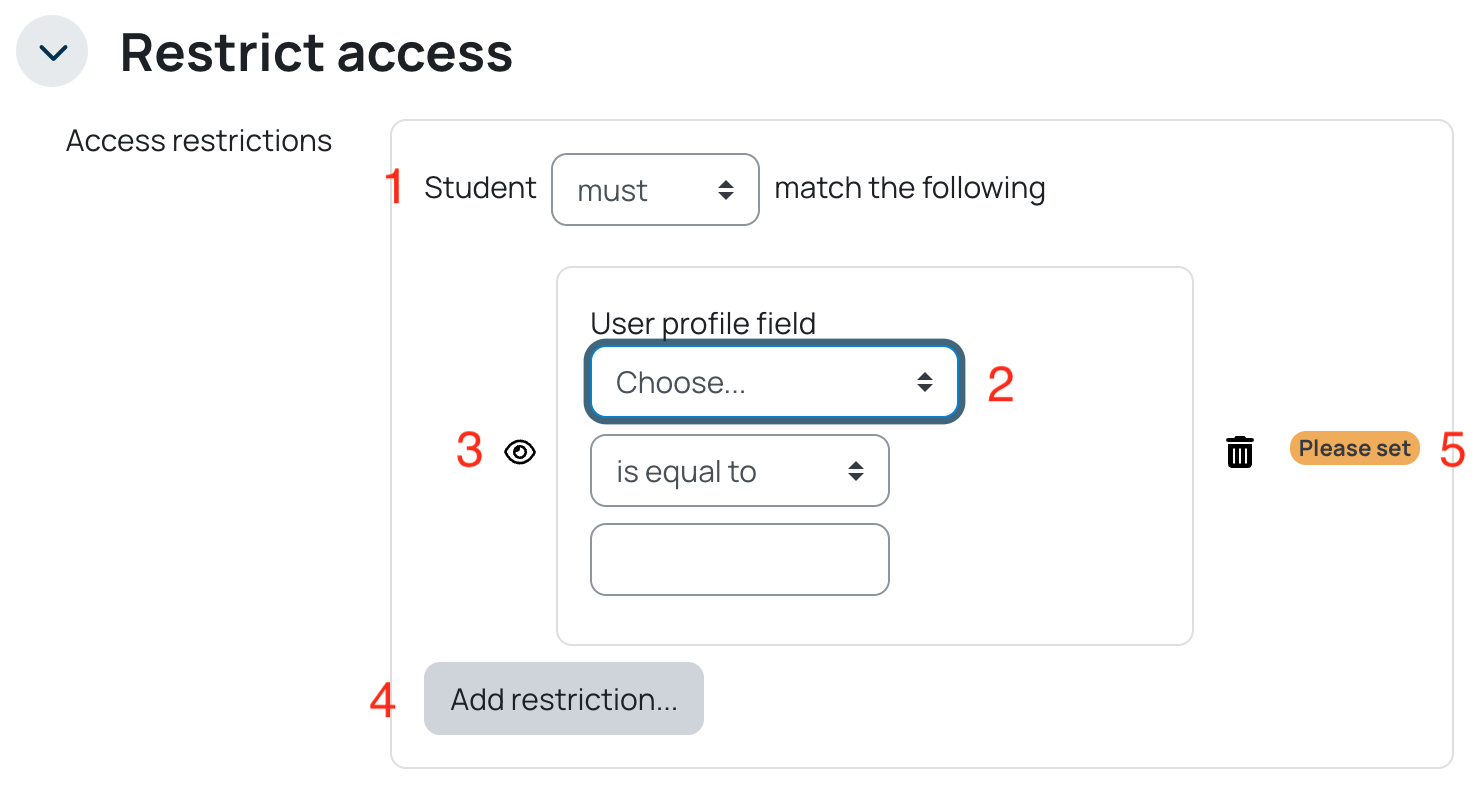
- You can choose whether the student must or must not match the following
- Choose on the dropdown the profile field to use, such as Student ID, email address, first name, last name, etc
- The eye shows whether other students can see the restricted item. For example, if you restrict a resource until a specific date, you can choose whether student can see the restricted link on the page before it becomes available for htem to access.
- You can add multiple restrictions. For example, this resource is hidden until this date and only available for this group.
- You can remove any restrictions you no longer want.
Creating interactive content (H5P)
Creating interactve content (H5P) #
H5P makes it easy to create, share and reuse HTML5 content and applications. H5P empowers everyone to create rich and interactive web experiences more efficiently.
H5P content is responsive and mobile friendly, which means that users will experience the same rich, interactive content on computers, smartphones and tablets alike.
At present we have the following (click to see the example in Moodle)
H5P can be shown as a link to the activity that the student can click to access, or the H5P activity can be embedded into your page.
This short video will get you started with creating your own interactive content!
For more information regarding interactive H5P content, please email tel@chi.ac.uk to arrange guidance.
For more support with Moodle, please contact the Technology Enhanced Learning Team: tel@chi.ac.uk